How to connect the chronothermostat to the boiler

In this article we will see how to connect the chronothermostat to the boiler , an operation that involves two possible scenarios, depending on whether or not the consent cables are already connected to the contact TA ( Room Thermostat ) of the boiler.
How does a programmable thermostat work?
Before proceeding with the instructions for connection, let's see how does a chronothermostat work ( here you can see how the Wi-Fi one works). We can think of this device as a normal thermostat but equipped with the possibility of hourly programming .
This feature is very useful as it allows for notable savings on consumption for heating compared to a classic thermostat.
Why? Why will the boiler be operated only when really needed , also thanks to the possibility of setting comfort and reduction temperatures , yes avoids excessive heat dispersion which would then lead to a large consumption of energy to return to the desired comfort temperature.
For further information you can read this article from our magazine: Thermostat or Chronothermostat?
How to connect a programmable thermostat to the boiler in 5 steps
Before starting, let's make a necessary premise: the boiler connection should always be carried out by specialized boiler technicians o professional electricians .
1. Preliminary operations
Disconnect the mains voltage.
2. Connecting the cables to the boiler
In most cases this step is not necessary, because the connections are usually made when installing the boiler. However, it is useful to see how you should act if you were to connect the cables to the boiler, because can be useful especially in the case of installing a radio receiver .
Then identify the thermostat connection terminals in the boiler, normally indicated as CT contact . Some boilers have a jumper on the TA contact terminals. To make the connections correctly it is necessary consult the boiler instruction manual .
3. Connect the chronothermostat
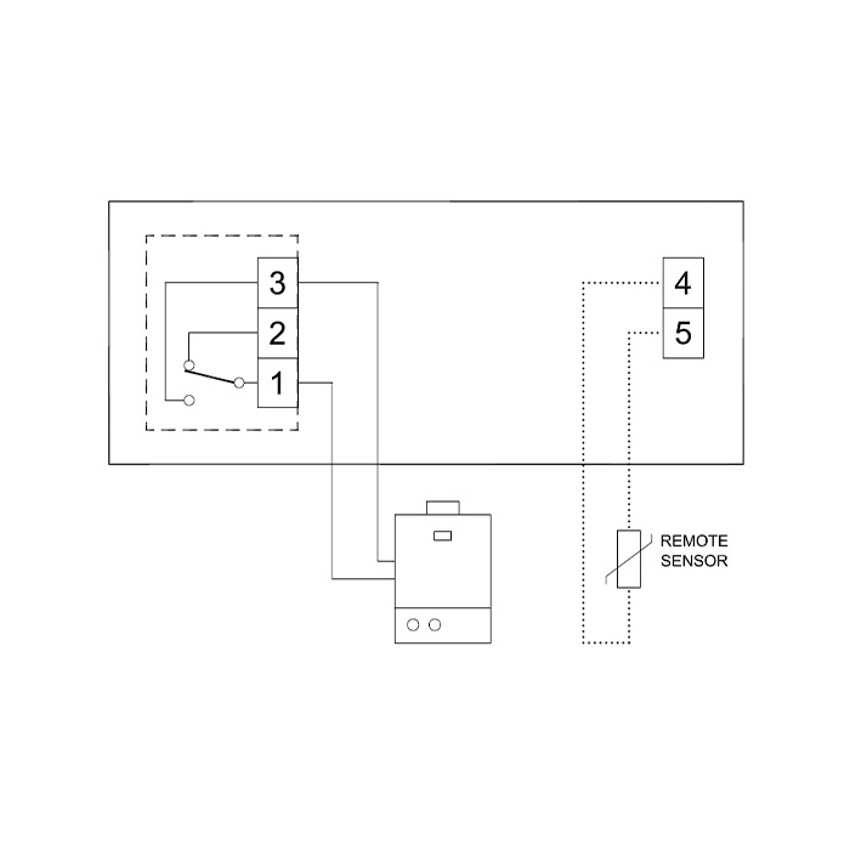
In this step we assume that the cables connected to TA contact , are already present in the point chosen for installing the chronothermostat. In this case it will be sufficient to connect the terminals Common and NA (normally open) of the thermostat . Even here it is still necessary to rely on connection diagrams of the chronothermostat (see example below). To learn more about this step you can read our article: Two-wire thermostat: how to connect it
4. Bonus: connect a radio receiver
As we were saying, normally all home systems already have the boiler consent cables set up. It may therefore be more common to need to operate on the boiler if you want to install a radio receiver to use a wireless chronothermostat.
How do we proceed? Exactly as in the case of the chronothermostat.
We connect two cables to the TA terminals of the boiler . We bring the cables to the point where we want to install the receiver. It usually makes sense to place it close to the boiler .
Now all that remains is to connect the cables to the receiver following the connection diagrams, in a very similar way to the chronothermostat.
What is the advantage of this solution? Leave total freedom in the positioning of the chronothermostat, which at this point, communicating via radio with the receiver , no longer needs to be connected to any cable.
For further information you can read: Thermostat, where to place it?
5. Check the connection
How to check if everything is working properly?
Simply set the chronothermostat to manual and raise the comfort temperature above that detected in the room. You will see a flame appear on the display and you will hear a click which signals the closing of the relay.
At this point you can move to the boiler and with the help of a tester verify that the connection is actually closed. To do this, simply set the tester to "ohm" (diode symbol) and place the leads on the TA terminals. If everything worked we should see 0 on the display .
For further information you can also read: How to check if a thermostat is working .

How to find the right programmable thermostat for your needs
Ok, now you know how to connect a programmable thermostat. But how do you choose the one that's right for you? You need to ask yourself some questions that can help you.
Do you need to control the heating with your smartphone?
If the answer is yes, then the choice must fall on a wifi programmable thermostat. Seitron offers two solutions:
- Wi-Time : this is a wifi chronothermostat powered at 230V with semi-recessed installation on 503 box.
- hygge : battery-powered wifi chronothermostat with radio communication with the boiler . Thanks to the installation of the radio receiver in the boiler and battery power, hygge becomes completely portable and can be placed anywhere with absolute freedom. Its particular design also makes it a real furnishing object .
If, however, remote control is not a priority, the best solution is certainly ours Freetime Evo . This is a battery powered programmable thermostat with daily and weekly programming as chosen by the user. Its distinctive feature? The incredible simplicity of programming !
Can't you carry out building work?
If you want to install the chronothermostat in a different point from those already prepared and you do not have the possibility of carrying out building works to bring the consent cables to the new installation point, the best solution is our wireless kit .
In addition to the already mentioned hygge , you can choose between:
- Wireless chronothermostat kit : the kit consists of a wireless chronothermostat powered by batteries and by radio receiver . An ideal solution to have freedom of installation and possibility of regulating the heating on an hourly basis.
- Wireless thermostat kit : as with the previous kit, this solution leaves maximum installation freedom. It's the ideal choice for those who do not have heating programming needs .